


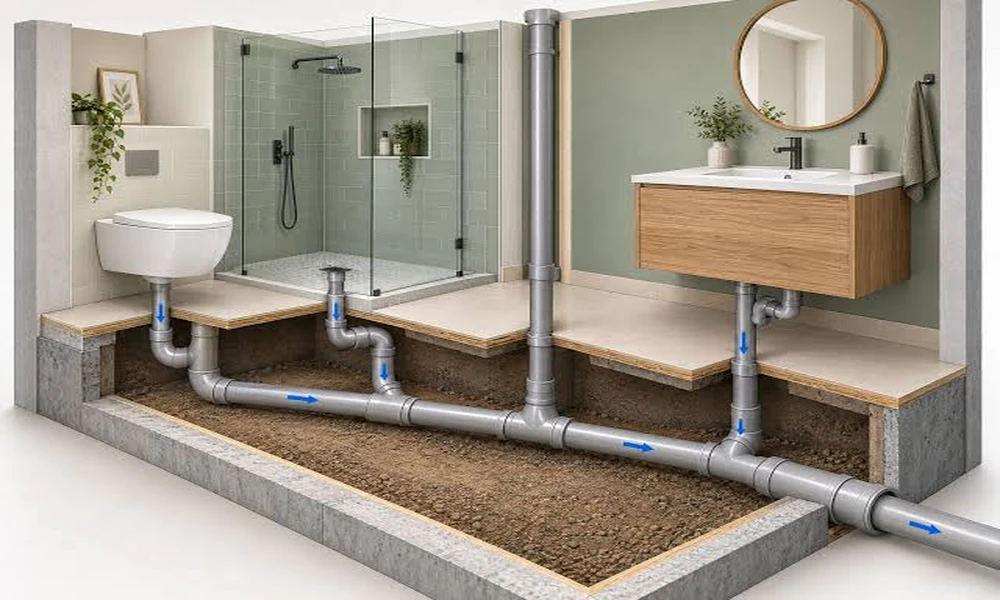
Remodeling shows make it look simple. The old tub comes out, a walk-in shower goes in where the closet used to be, and the toilet moves across the room. In a house with a crawlspace, that kind of move is mostly carpentry and a few new pipe runs. In a house built on a concrete slab, every drain you move means cutting into the foundation.
Many Central Texas homes sit on slabs, and that changes how a bathroom or kitchen remodel gets planned. Local plumbers who do remodel work, such as Manny’s Plumbing, usually start by asking where the existing drains run beneath the concrete. That one detail often decides whether a new layout is a weekend of rough-in work or a project with trenching, inspections and new concrete.
Before you fall in love with a floor plan, it helps to know what’s actually under your feet and why some changes cost much more than others.
Water Lines Bend but Drains Do Not
Supply lines and drain lines behave very differently during a remodel. Supply lines carry water under pressure, so they can go up, down and around corners. In many slab homes the original supply lines run through the slab, but plumbers can often abandon those runs and reroute new PEX lines through the attic or the walls. Moving a sink’s water supply is rarely the hard part.
Drains are another story. They work by gravity, so every drain pipe needs a steady downward slope toward the main sewer line. The usual target is about a quarter inch of drop for every foot of pipe. That slope has to be built into the trench beneath the slab. You can’t run a toilet drain through the ceiling and hope gravity cooperates.
So when someone says “just move the toilet two feet,” the real question is how far the new spot is from the existing drain, and whether the pipe can keep its slope over that distance.
What Trenching Through a Slab Involves
When a drain has to move, the work usually goes in a set order.
- The plumber marks the path of the new drain and the location of the existing line it will tie into.
- A concrete saw cuts two parallel lines through the slab, and the strip between them is broken out by hand or with a small jackhammer.
- Soil is dug out to the depth the new pipe needs to hold its slope.
- New pipe is laid, connected and supported on bedding material.
- The system is tested before anything gets covered.
- The trench is backfilled, compacted, and patched with new concrete, often with steel dowels drilled into the old slab so the patch stays tied in.
That sequence explains why slab work adds both time and dust. It also explains why the testing step matters so much. Once fresh concrete covers a leaking joint, finding and fixing it means breaking the floor open again.
Why Older Drains Often Get Replaced Anyway
Opening the slab gives you a rare look at pipes that have been hidden for decades. Many homes built before the 1980s used cast iron drains under the slab. Cast iron lasts a long time, but over many years it can corrode from the inside, crack, or develop rough scale that catches debris. Some homes from the 1980s used ABS plastic, and certain batches from that era have known defects.
If the trench shows deteriorated pipe near the work area, it often makes sense to replace that section while the floor is already open. A camera inspection of the main drain before demolition can show what you’re dealing with, so the decision gets made on purpose and not halfway through the job.
Venting Is the Detail Homeowners Forget
Every fixture drain needs a vent, which lets air into the system so water flows smoothly and doesn’t siphon the water out of the trap. Without a working vent you may hear gurgling, notice slow drains, or smell sewer gas.
When you move a fixture, its vent has to work at the new spot too. In a slab home that usually means running a vent pipe up through a wall and tying it into the existing vent system in the attic. That can affect where you put a wall, whether a window can stay, and how deep the framing has to be. Island sinks in kitchens are especially tricky because there’s no wall nearby, so they often need special venting methods that local code has to allow.
Fixtures Worth Choosing While the Walls Are Open
A remodel is the cheapest time to upgrade the fixtures and valves, because the walls are already open. Toilets are a big one. Older models can use several gallons per flush, while the EPA notes that WaterSense labeled toilets use 1.28 gallons per flush or less and still perform as well or better. For a household replacing more than one old toilet, the savings show up on the water bill quickly.
Shower valves matter just as much. A pressure-balancing or thermostatic valve keeps the water temperature steady when someone flushes a toilet or runs a dishwasher elsewhere in the house. That’s a comfort upgrade and a safety one, especially for kids and older family members. Pairing the valve with an efficient showerhead from the EPA’s WaterSense showerhead list keeps water use down without making the shower feel weak.
Individual shutoff valves at each fixture are a small detail that pays off for years. When a faucet starts dripping, you can turn off that one fixture instead of the whole house.
Planning a Layout That Respects the Slab
The smartest remodel plans work with the existing plumbing where they can and move things only when the payoff is worth it. A few habits help.
Keep wet areas grouped together. A new shower that shares a wall with the old tub location can often tie into the existing drain with a short run. Moving it to the opposite side of the room is a much bigger job.
Think about the main line’s route. Fixtures that sit closer to the main sewer line, or along its path, need shorter trenches. If you aren’t sure where it runs, a plumber can locate it with a camera and a transmitter before you finish your design.
Plan for permits and inspections. In most cities, drain work under a slab has to be inspected before it’s covered. That creates a short pause in the schedule, and it’s better to plan for it from the start than to have it surprise you.
Budget for the floor itself. Once the trench is patched, the finished flooring over it usually needs replacing. Tile rarely matches perfectly after a decade of wear, so many homeowners replace the whole floor in that room.
Living With the Choice for Decades
A bathroom layout usually stays in place for twenty or thirty years. The money spent under the slab won’t show in photos, but it decides how well the room drains, whether it smells fresh, and whether you’ll be cutting concrete again a few years from now.
Taking the time to understand the plumbing beneath the slab turns a remodel from a gamble into a plan. When you know where the drains run, how far they can reasonably move, and what shape the old pipes are in, you can choose a layout that looks good on day one and still works long after the paint has faded.

